 Cinema 4D
  After Effects
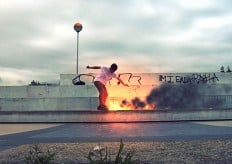
 In this video tutorial on Cinema 4D and After Effects, we'll learn how to create an animation on a photo-realistic scene with the help of camera mapping.
Then we'll add an effect commonly known as the “tilt shift effect” using the camera lens blur in After effects. And finally we'll see how to export 3D coordinates data from Cinema 4d towards After Effects in order to create volumetric effects that perfectly matches the 3D animation.
Discover the C4D R14 Camera Calibrator
The new tools implemented in Cinema 4D R14 allows us set up camera mapping scenes very easily. With the help of the camera calibrator, the only thing you need is well placed guidelines to re-establish the position of the camera that was used to capture the shot. Once this position is obtained, we'll use the camera to project the image on 3D objects, thus recreating volume in the picture.
Most recent versions of After effects (CS5 and later versions), includes a new tool that makes it possible to re-create depth of field within a scene using a rendered Z depth pass. We'll learn how to hijack this tool to obtain the tilt shift effect.
- Learn to use the Cinema 4D R14 camera calibrator tool to extract camera position and projection material.
- Use basic modelling skills to create simple objects on which to project the image using the camera mapping technique.
- Learn to avoid most common problems encountered when animating the camera within a camera mapped scene.
- Export 3D coordinates from Cinema 4D towards After Effects and create track mattes for compositing.
- Create the tilt-shift effect using the camera lens blur in After effects
- Create smoke plumes with the trapcode particular plugin
- Exploit 3D coordinates from Cinema 4D within After Effects.
Download the photo on iStockphoto
Thanks to a partnership with iStockphoto, you'll soon be able to download the photo used in this tutorial for free upon subscription, or if you already have an account.
Thank you for coming back in a few days to get the download link.

Awesome Tutorials!!
i Can Download This Tutorial ?
me too
good one :)
Really helpful tutorial, thanks.
Rather than manually position a new camera with all that copying and pasting, why not just duplicate the original camera and the delete the calibration tag – much easier.
Gordon
I love It
nice one
how to download this lesson?
Can it be possible to download? i am often without internet working, and it would help if it would be possible to view it in that time... thanks in advance
how to download this lesson?
It will be nice to download the video so we can watch it without an internet connection. Thank you.
Great tutorial.
great
AWESOME!
Great tutorial! Sorry if I missed this, but how do we cast the shadows on the street below the text? Thanks!
cool
great tutorial, though I would love to be able to download and speedup while listening, maybe it just me but the fact that you stop speaking at the end of every sentence is distracting :(
good
good tut! this is helpful for me~
Lovely tutorial.
I will so appreciate it, if the tutorial can be download by me for easy follow up, thanks